
Use this calculator to check whether your LED strip and diffuser gap will look smooth or show visible dots.
Advanced options
Table of contents
How to use our LED Strip Diffuser Calculator
- Enter LED density and choose the matching Density unit, either LEDs per meter or LEDs per foot.
- Enter the measured Gap from LED to diffuser in millimeters, measured from the top of the LED chip to the inside face of the cover.
- Choose the Diffuser finish, then open Advanced options only if you want a stricter Smoothness target, a data-sheet Diffuser light pass-through, or a Strip brightness before diffuser estimate.
- Click Calculate and use Smoothness score first: 100 percent meets the selected target, below 100 means dots are more likely, and above 100 means extra gap.
- Sanity-check the output by comparing LED spacing with Gap from LED to diffuser; if the gap is much smaller than the spacing, a shallow channel will usually need a denser strip, deeper channel, or stronger diffuser.
Definitions
LED density: The number of LED chips along a strip length, entered as LEDs per meter or LEDs per foot.
LED spacing: The center-to-center distance between neighboring LED chips. Smaller spacing is usually easier to blend into one smooth line.
Gap from LED to diffuser: The air space from the top of the LED chip to the inside face of the diffuser cover, measured in millimeters.
Diffuser finish: The cover style, such as clear, frosted, or opal, that changes both dot hiding and light loss.
Diffuser light pass-through: The percent of light that makes it through the cover. This is also called transmittance on some data sheets.
Smoothness target: The selected rule for how much diffuser gap you want compared with LED spacing.
Smoothness score: The current gap divided by the target gap, shown as a percent. A score of 100 percent meets the selected target.
Common mistakes and quick fixes
Mistake: Using total channel height for Gap from LED to diffuser .
Fix: Measure from the top of the LED chip to the inside face of the diffuser cover.
Mistake: Entering a per-meter number in LED density while Density unit is set to LEDs per foot.
Fix: Match Density unit to the number printed on the strip listing or package.
Mistake: Treating Diffuser finish as only a style choice.
Fix: Remember that clearer covers keep more light, while opal or milky covers usually hide dots better but lower Estimated light kept .
Mistake: Typing 0.75 in Diffuser light pass-through when the data sheet means 75 percent.
Fix: Enter percent values from 1 to 100, such as 75 for 75 percent.
Mistake: Reading a negative Gap to add as a problem.
Fix: Negative Gap to add means your current gap is already larger than the selected target.
Mistake: Expecting Estimated brightness after diffuser without entering Strip brightness before diffuser .
Fix: Add the strip brightness in lumens per foot, or use Estimated light kept when you only need the percent.
Limitations & Key Assumptions / Boundary Conditions
- This is a rule-of-thumb smoothness check, not a lab photometry test. Viewing distance, room brightness, LED beam angle, and diffuser material can change what you see.
- The default Estimated light kept values are planning estimates for common finish types. Use Diffuser light pass-through from a real data sheet when you have it.
- The calculator treats the strip as evenly spaced LEDs. Unusual LED packages, side-firing strips, COB strips, lenses, or uneven chip spacing may not match the result.
- Gap from LED to diffuser must be the internal air gap. Lens height, tape thickness, and cover thickness can make the outside channel height misleading.
- Estimated brightness after diffuser only multiplies strip lumens per foot by diffuser pass-through. It does not include wall absorption, voltage drop, heat, driver losses, or dimmer settings.
- A low Smoothness score does not mean the setup cannot work. It means dots are more likely unless viewing distance, a stronger diffuser, or a different strip helps hide them.
Methodology
How the smoothness check works
The calculator first turns LED density into LED spacing. Then it compares your measured Gap from LED to diffuser with the gap needed for the selected Smoothness target. The default target is 1.0, meaning the gap should be about the same as the LED spacing for a normal smooth-line check.
led_spacing_mm = 1000 / led_density
Use that formula when Density unit is LEDs per meter.
led_spacing_mm = 304.8 / led_density
Use that formula when Density unit is LEDs per foot. The value 304.8 is the exact number of millimeters in one foot.
required_gap_mm = target_ratio * led_spacing_mm
smoothness_score_percent = 100 * gap_mm / required_gap_mm
gap_change_needed_mm = required_gap_mm - gap_mm
Smoothness score is not capped at 100 percent. A value above 100 percent means the measured gap is larger than the selected target. Gap to add is signed: positive means more gap is needed, and negative means the current gap is already beyond the target.
How the brightness estimate works
The calculator uses the entered Diffuser light pass-through if you provide one. If that field is blank, it uses the selected Diffuser finish estimate: clear 90 percent, semi-clear 80 percent, frosted 75 percent, and opal or milky 60 percent.
light_kept_percent = transmittance_override_percent if provided else default_transmittance_by_finish
light_after_diffuser_lm_per_ft = strip_output_lm_per_ft * light_kept_percent / 100
Estimated brightness after diffuser is shown only when Strip brightness before diffuser is entered.
Mini-example
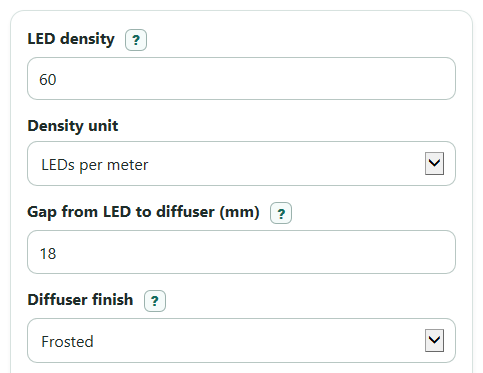
For a 60 LEDs per meter strip, the LED spacing is 1000 / 60 = 16.67 mm. With an 18 mm gap and the normal 1.0 target, the required gap is 16.67 mm, the smoothness score is 100 * 18 / 16.67 = 108 percent, and the gap to add is 16.67 - 18 = -1.33 mm. With a frosted diffuser, the estimated light kept is 75 percent.